
[soliloquy id=”8488″]
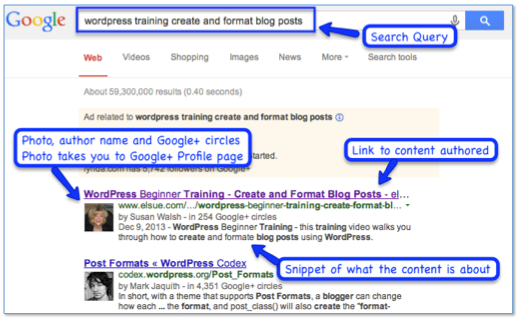
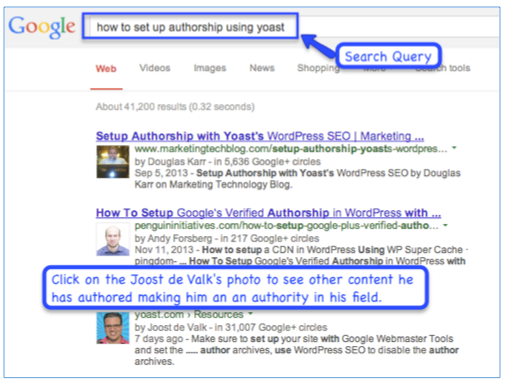
Google Authorship (rel=author) allows you to link your Google+ profile to the content you create on your blog, website or other websites. Once rel=author is setup correctly, Google search engine results displays a photo of the author that links to their Google+ Profile, a link to the content authored, along with a snippet of information about the content. The author’s photo, profile and other information makes them stand out, adds credibility and provides more click throughs to the authors website. This has become an important internet marketing strategy. Another example I love to show is Joost de Valk’s authorship results. Go and type “how to set up authorship using yoast”. You will see many rel=author results. Click on his photo – here you will see other content he has authored making him an authority and expert in his field. We use the Yoast WordPress SEO plugin to optimize our pages and posts and to setup rel=author. Yoast handles rel=author and makes it easy for you to attribute the home page to one author – it also does rel=author for individual authors. For example, there are the two of us at elSue who write blog posts. We each have our own User Profile and Google+ Profiles. We can select one of us to represent elSue for the home page, while we still get credit for our individual blog posts. In order to claim rel=author using Google+ and the WordPress SEO by Yoast plugin, I’ll walk you through the following steps: Note: If you need to setup a Google+ account, go to. https://plus.google.com/ or https://plus.google.com/ and setup your Google+ profile. Once you have created your Google+ account, click on “Profile” and “View profile as: Yourself”. Fill in the information to build your profile page. Most importantly- add a nice “head shot” photo of yourself. This will be the photo used when your blog posts or articles appear in Google’s search results. [ba-list style=”check”]
WordPress SEO by Yoast
[/ba-list]
Google+ Profile
[/ba-list] 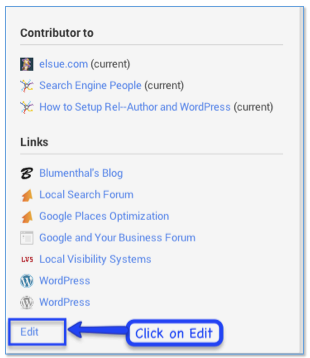
Contributor to
Add your website first and any other websites or blogs you write articles for. For example, elSue quest posts on Search Engine People. We did the following so that those posts will show up in the search results with the Author profile. All you need to do is:
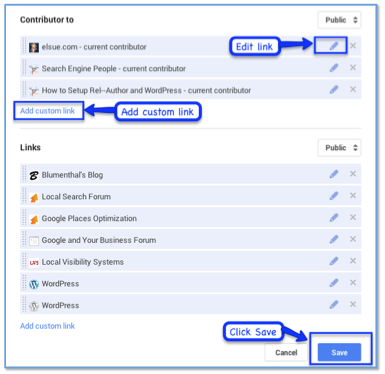
[ba-list style=”check”]- Add custom links
- You can edit them too
- Be sure it is formatted with the http://www. (see example below)
- Save and repeat by clicking on “Add custom link”
 Note: Make sure your +1′s are public on your Google+ profile or it won’t work (Per Yoast)
WordPress SEO Yoast Plugin
[ba-list style=”check”]- If you do not have the Yoast Plugin installed, go to your WordPress Dashboard > menubar > Plugins
- At the top of the page click on the Add New button
- Search for WordPress SEO by Yoast – it is on the top with 4.5 stars
- Click “Install Now” and “Activate“
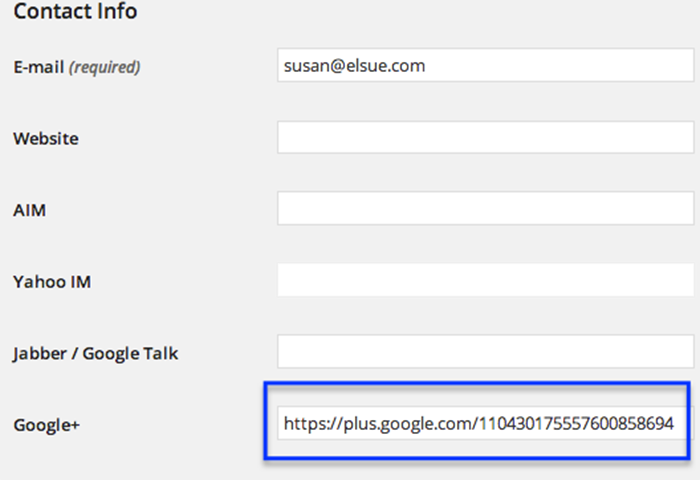
Add your Google+ Profile link to your website user profile
To connect your WordPress user profiles with your Google+ Profile, you will need the link from your Google+ Profile page. Login to your Google+ Page – it is at the top in your browser. I used a profile that is not using the new Vanity URL feature – copy the Http:// through the end of the numbers – don’t copy anything else. ![]()
Google+ Vanity URLs
Many of you have the Google+ Vanity URL for your Profile page. We have tested this using Yoast. You can enter your Vanity URL in the Google+ field instead of the long address with all of the numbers.
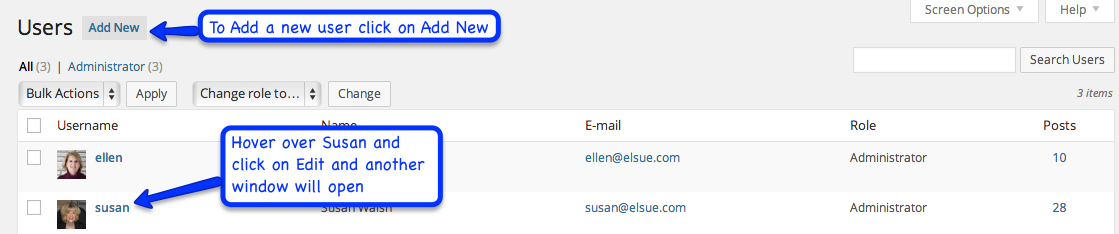
- Login to your WordPress website
- Go to the Dashboard menu and click on Users and then “All Users”
- You will see the User Profiles
- If you want to add a new user, click on “Add New”
Add the Google+ Profile link
Webmaster Tools – Structured Data Testing Tool
Go to Webmaster Tools — Structured Data Testing Tool to test it out. I used a blog post from our website. Past in the link and click Preview.
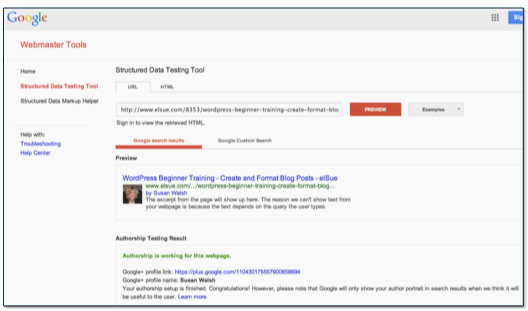
Yeah! It Worked. After you finish and your test results are good, go and do some searches in to see if your author photo and profile shows up in Google’s search results. I search using my name and company “Susan Walsh elSue” (don’t put in the quotes). Or search for a recent article or blog post you authored. It may take a while to for you to show up in Google’s search results – be patient it’s well worth it. If you are not writing posts or articles on your blog or website, get going. You can also guest post if you have time to reach a wider audience.
Wrap-up
We welcome your comments. Google+ Authorship is improving all of the time. Our next blog post is on “How to Setup Google Publisher“. It’s a great way to brand your business. We use Yoast to do both rel=author and rel=publisher and install it on the websites we create.
Note: We don’t get paid or receive anything from Yoast for touting how much we like their plugin.